
Your cart (0)
Your cart is empty
Tax included and shipping calculated at checkout
Your cart is empty
Tax included and shipping calculated at checkout

Last Updated: October 12, 2026
Divot spikes are the two prongs on a divot tool or putter accessory that you push into the turf around a ball mark to lift the grass back into shape. Learning the proper way to use divot spikes takes about ten seconds per mark, and it saves the green from damage that can take weeks to heal.
Here's the thing most golfers get wrong: they jam the spikes straight into the middle of the depression and pry upward. That tears roots and kills the grass. The right move is to work the edges, not the center.
At Divot King, we designed our putter accessory around this exact problem. The spikes aerate the soil and help fluff the green back into shape after a ball mark, and the tool clips onto your putter so you never have to dig through your pocket mid-round.
A ball mark is damage on the putting green caused by a ball's steep descent. A fairway divot is a chunk of turf displaced by an iron shot from the fairway.
They need different fixes:
Most guides blur these together. Don't. The technique, the tool, and the recovery time are all different.
An unrepaired ball mark takes far longer to heal than one fixed within minutes. The depression smothers the grass underneath and creates a dead patch that spreads.
Repairing your mark is also basic golf etiquette. The USGA guidelines on course care note that golfers should repair their own ball marks plus one extra. That habit keeps greens smooth for everyone behind you.
The proper ball mark repair technique takes under 15 seconds. Here are the four steps, in order, plus the variations that change the technique for different turf conditions.
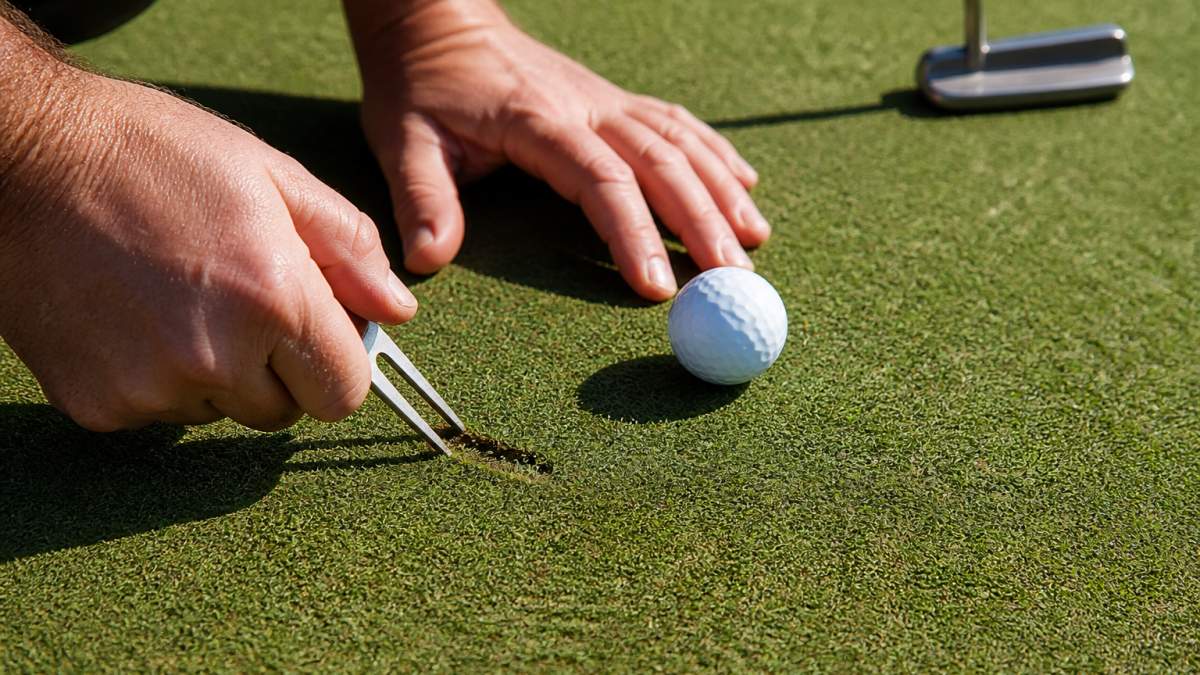
Look for a small depression with bruised or discolored grass around the rim. On bentgrass greens, the edges often look slightly raised. A fresh mark sits shallow; an old one may have crusted over.
Two things separate a ball mark from other green damage:
If you are not sure which you are looking at, press the area lightly with your thumb. A ball mark gives slightly and springs back; a divot feels like a hole with loose soil.
Push the spikes into the turf at the edge of the mark, about 45 degrees from vertical. Never insert them into the center of the depression. The center is where the roots are most damaged, and pushing there makes it worse.
How deep you go depends on the mark:
Work your way around the edge like a clock face. At each point, gently push the turf inward toward the center. Lift slightly as you push. Move turf inward from all sides, not just one.
A common pattern among experienced players is to work in a circle, pushing inward at roughly eight to twelve points around the rim. The goal is to bring the edges together without pulling the surrounding turf loose.
Once the edges meet, press the repaired area flat with your putter or your foot. The goal is a level surface with no bump. Step away and check it from a few feet back.
A quick finish check:
If any of these fail, press the area down again and re-check before you walk away.
Angle and lift are the two things that separate a clean repair from a torn-up green. Get them right and the turf recovers in days. Get them wrong and you leave a scar that lasts weeks.
The 45-degree angle matters because it lets you lift the turf without ripping the roots underneath. Push straight down and you sever them. Angle in and you work with the grain of the grass.
Here's the sequence in plain terms:
The R&A course maintenance guidance stresses that gentle inward pressure, not force, is what restores the surface. A light touch repairs faster than a heavy hand.
A good divot tool has two sturdy prongs and a comfortable grip. Flimsy tools bend under pressure and can snap, leaving a sharp edge in your pocket.
When picking a tool, look for:
The Divot King accessory solves the storage problem with a protective click-on cover. It also has a magnetic ball mark and a universal sleeve adapter that fits most putters. That means fewer items in your pocket and one less thing to fumble for on the green.
Safe handling matters too. Never carry an exposed divot tool in your pocket where the prongs can poke you. And always point the spikes down when you pull it from your bag.
The most common ball mark repair mistakes all come from impatience. Here are the ones we see most often, and what each one costs the green.
| Mistake | What Happens | The Fix |
|---|---|---|
| Pushing spikes into the center | Tears roots, kills grass | Work only the edges |
| Prying upward | Lifts turf out of the soil | Push inward, not up |
| Twisting hard | Rips adjacent turf | Twist gently, if at all |
| Leaving the mark raised | Creates a bump on the green | Press flat with your putter |
| Skipping the repair | Dead patch spreads | Fix every mark you make |
Check your work before you walk away. A good repair sits level with the surrounding turf. If you can feel a bump under your putter, press it down again.
Spiked golf shoes are a separate concern, and they are worth understanding because the word "spikes" in this topic can mean two different things: the prongs on a divot tool, or the spikes on your shoes. Both can damage a green if used carelessly.
Modern soft spikes are designed to spread weight across the sole, but they can still damage a green in three common ways:
The fix is simple: lift your feet when you walk, avoid sharp turns near the hole, and take a normal stride instead of a shuffle. The Golf Course Superintendents Association of America notes that most green damage from shoes comes from dragging, not from the spikes themselves. Walk softly and you'll do no harm.
A quick aftercare checklist before you leave the green:
Every ball mark you leave behind is a small wound on the course. Fix it right and the green heals in days. Fix it wrong and you leave a scar that outlasts your round by weeks.
The Divot King accessory puts the tool where you need it: clipped to your putter, with a magnetic ball mark, a universal sleeve adapter that fits most putters, and a protective cover that keeps it safe in your bag. No more digging through pockets for a coin and a bent prong.
Get started with Divot King and keep every green you play in pristine shape.
No. Inserting spikes into the center of the depression pushes the soil down and can tear roots, making the damage worse. Instead, work around the edge of the mark, angling the tool at about 45 degrees. Gently push turf inward from the edges toward the center. This lifts the depression and helps the grass recover without harming the root system.
A properly repaired ball mark is level with the surrounding green and feels smooth underfoot. After working the edges inward and pressing down, run your putter or foot lightly over the spot. If you feel a dip or bump, adjust the turf. The goal is a seamless surface that lets the grass heal and keeps putts rolling true.
A ball mark is a depression on the putting green caused by a ball's impact. A divot is a chunk of turf displaced from the fairway by a club. Repair ball marks with a divot tool or divot spikes by lifting the edges. Repair fairway divots by filling them with divot mix or sand. They require different techniques and tools.
Yes. When used correctly, divot spikes pierce the soil around a ball mark, which aerates the turf and helps fluff it back into shape. This promotes growth and speeds recovery. The key is to insert the spikes at the edge and gently push inward, not to stab the center. Proper use supports green health and playability.